This article explains how to set up the RNA-Seq FASTQ processing pipeline in Subio Platform for Windows. Subio Platform uses the following tools to obtain gene expression data from FASTQ files. For the macOS setup instructions, see Setting Up the RNA-Seq FASTQ Processing Pipeline on macOS.
| Tool | Function | Tested Version |
|---|---|---|
| fastp | Adapter trimming and low-quality read filtering | 1.4.0 |
| Kallisto | Rapid expression quantification using a reference transcriptome | 0.52.0 |
| HISAT2 | Read alignment to a reference genome | 2.2.1 |
| StringTie | Transcript expression quantification using HISAT2 alignment results | 3.0.3 |
The versions listed above have been tested with Subio Platform. Other versions may also work.
This article first explains how to set up the Kallisto pipeline, followed by the setup procedure for HISAT2 + StringTie. If you do not plan to use HISAT2 + StringTie, you can skip that part of the setup.
If an error occurs while processing FASTQ files,
check the temporary folder created inside the folder containing your FASTQ files.
The run.log file in that folder records information about pipeline execution and errors.
If the log has been compressed as run.log.gz,
decompress it before viewing its contents.
You may be able to identify the cause of the error and find possible solutions
by asking an AI assistant such as ChatGPT to examine the run.log file.
1. Setting Up Windows Subsystem for Linux (WSL)
Subio Platform for Windows uses Linux versions of fastp, Kallisto, HISAT2, and StringTie. To run these tools on Windows, you need to install Windows Subsystem for Linux (WSL) and the Ubuntu Linux distribution.
If WSL is not installed, follow Microsoft's official instructions to set it up. If you already have WSL and Ubuntu installed and working, you can skip this step.
When you launch Ubuntu for the first time, you will be asked to create a Linux username and password. You do not need to install a Linux desktop environment.
2. Downloading and Configuring fastp
For fastp, use the Linux executable available from the official GitHub repository. Follow the instructions under "or download the latest prebuilt binary for Linux users" in the README.
Run the following commands in the Ubuntu terminal to download the latest prebuilt executable.
wget http://opengene.org/fastp/fastp
chmod a+x ./fastp
You can also download a specific version. For example, to download fastp 1.4.0, run the following commands.
wget http://opengene.org/fastp/fastp.1.4.0
mv fastp.1.4.0 fastp
chmod a+x ./fastp
You can select the downloaded executable using Windows File Explorer. In the Subio Platform pipeline settings, specify the Windows file path to the executable. You do not need to enter a WSL path.
3. Downloading and Configuring Kallisto
Download the Linux version of Kallisto from its official GitHub repository.
- Open the official Kallisto releases page.
- Download kallisto_linux-v0.52.0.tar.gz.
- Extract the downloaded archive.
- In the Subio Platform pipeline settings, select the extracted Kallisto executable.
4. Configuring the Kallisto Index
To process FASTQ files with Kallisto, you need a transcriptome index for the species you are analyzing. Click the "Download reference data..." button in the Subio Platform pipeline settings to open the species selection window. After you select a species, the required reference data will be downloaded and configured automatically. If you have already downloaded the reference data, you can specify the path to the corresponding file directly.
5. Testing the Kallisto Pipeline
Because processing FASTQ files can take considerable time, we recommend first limiting the number of reads processed to confirm that the pipeline works correctly.
- Open the pipeline settings in Subio Platform.
- In the fastp settings, select the "Process 10000 reads" preset and click "Load".
- Import FASTQ files for one or two samples and confirm that processing completes successfully.
- After the test is complete, remove the samples imported for testing.
- In the fastp settings, select "Default" and click "Load" to restore the normal processing settings.
Be sure to restore the "Default" preset before starting your full analysis. If "Process 10000 reads" remains selected, only up to 10,000 reads from each FASTQ file will be processed.
6. Downloading and Configuring HISAT2 and StringTie
This section explains how to set up the HISAT2 + StringTie pipeline. If you only plan to use Kallisto, you can skip the remaining setup steps. You can continue using the fastp executable you have already downloaded.
Downloading HISAT2
- Open the official HISAT2 download page.
- Download the "Linux_x86_64" package for HISAT2 2.2.1.
- Extract the downloaded archive.
- In the Subio Platform pipeline settings, select the extracted HISAT2 executable.
Downloading StringTie
- Open the official StringTie releases page.
- Download stringtie-3.0.3.Linux_x86_64.tar.gz.
- Extract the downloaded archive.
- In the Subio Platform pipeline settings, select the extracted StringTie executable.
If a downloaded Linux executable does not have execute permission,
use chmod a+x in the Ubuntu terminal to make it executable.
7. Configuring the HISAT2 Index and GTF File
The HISAT2 + StringTie pipeline requires a reference genome index and a GTF file containing gene annotations.
- Download the HISAT2 Index for the species you are analyzing.
- Prepare a GTF file that corresponds to the same reference genome version used to build the index.
- In the Subio Platform pipeline settings, specify the paths to the HISAT2 Index and GTF file.
Make sure the HISAT2 Index and GTF file correspond to the same reference genome. Using different genome versions may affect the accuracy of expression quantification.
8. Testing the HISAT2 + StringTie Pipeline
As with Kallisto, first limit the number of reads processed to confirm that the HISAT2 + StringTie pipeline works correctly.
- In the Subio Platform pipeline settings, select the "Process 10000 reads" preset for fastp and click "Load".
- Import FASTQ files for one or two samples using the HISAT2 + StringTie pipeline.
- Confirm that processing completes successfully.
- Remove the samples imported for testing.
- Restore the "Default" fastp preset and click "Load".
Use the "Default" preset for your full analysis.
9. Starting Normal FASTQ Processing
The RNA-Seq FASTQ processing pipeline is now configured. After confirming that the settings used for testing have been restored, import the FASTQ files you want to analyze. Note that the tests described above only confirm that the pipeline can run successfully from start to finish. They do not establish the reliability of the resulting expression data. To assess data quality and the reliability of the results, it is important to examine read quality, alignment results, and expression distributions across samples. For more information, see our case study on identifying problems in analysis results through data visualization.
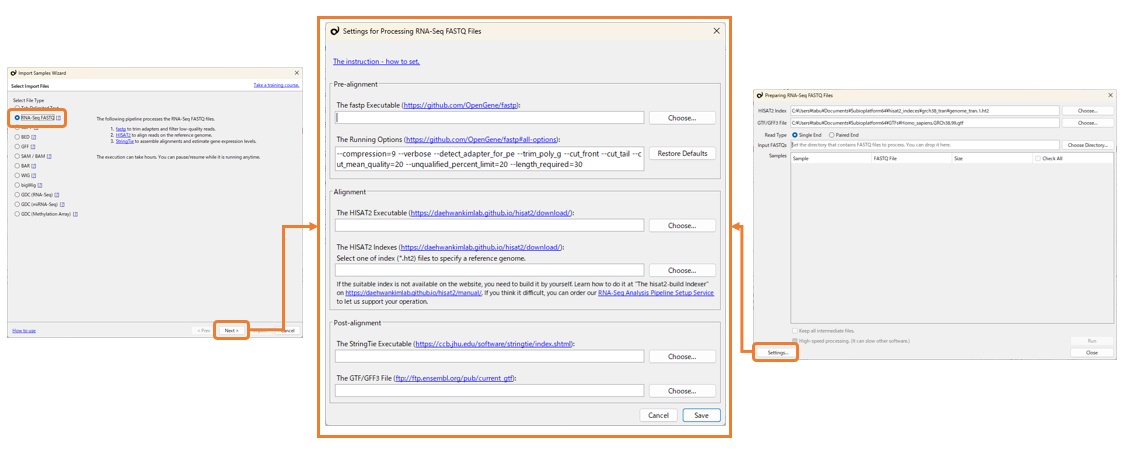
Subio Platform Pipeline Setup and Execution Workflow
The diagram below illustrates the sequence of screens from configuring the pipeline in Subio Platform to executing FASTQ file processing. The basic workflow is the same for both Kallisto and HISAT2 + StringTie.